
This technique is little known, but it also enables you to add locale-specific data, so your site is translated "on the fly", depending on the user's browser language.
Resources are specified in *.resx files, and the following types of data are supported: Strings, Images, Icons, Audio and Other Files.
The advantage of this is that each category and subtype is accessed via a strongly typed property. For example, *.bmp images appear as a System.Drawing.Bitmap class, and the properties of a Bitmap can then be directly accessed with the IntelliSense. (That's really cool, by the way!)
It does not give you the same flexibility as Azure Configuration properties, or simply loading data from a database, but for web components that do not often change, Resources are a great way to consolidate data in a convenient location and provide localization for international users, if needed.
So, how can we do it?
Open Visual Studio and create an ASP.NET MVC project. The procedure of creating and managing Resources differs slightly in .NET Core compared to .NET Framework, but the effect is essentially the same. Both platforms also allow you to create localized Resources. I suggest using the C# programming language.
In your ASP.NET MVC project, create a folder called App_GlobalResources. This is more pertinent to .NET Framework, as upon creation of the folder, the icon will change to the icon used by images (e.g. *.bmp files). This does not happen with an ASP.NET Core project.
You may choose any folder name you want, but I suggest App_GlobalResources as good practice.
Now to create the actual Resource file
.NET Framework: Right click on the App_GlobalResources folder, and select Add > Resources File
A small window will pop-up: "Specify Name for Item"
Give the item a name like MyResource and click [OK]
.NET Core: Right click on the project, select Add > New Item...
Look through the list for "Resources File", and give it a name, e.g. MyResource.resx, then click [Add]
After the file is created, move it to the App_GlobalResources folder for safe keeping.
Now we have a MyResource.resx file in our App_GlobalResources folder.
Notice that file is "backed" by a *.Designer.cs file, e.g. MyResource.Designer.cs
DO NOT EDIT THIS FILE. It is auto-generated, and you don't need to be concerned with what it is or how it works.
Setting the file properties
Now comes the fun part. It turns out, there are a few quirks to using Resources.
There are three important file properties that you need to set.
So, select your MyResource.resx file in Visual Studio, and configure the following properties:
- Build Action: Embedded resource
- Custom Tool: PublicResXFileCodeGenerator
- Custom Tool Namespace: MyWebApplication.Resources
Note: "MyWebApplication" should reflect the namespace of your web application.
These steps are important, as it will instruct the code generator to generate code which can be used by IntelliSense, and allow you to consume the Resource content within your application.
How to add content to your Resource
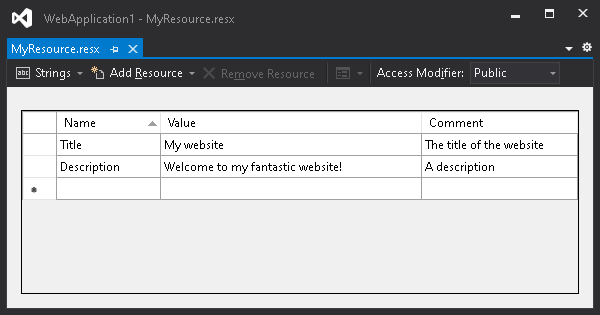
This is the easy part. Double click the *.resx file and you will get a very beautiful window with three columns:
Name | Value | Comment
There is also a drop-down menu (which defaults to Strings) that enables you to switch between Resource types. You can also add Resources of various types to this file by using the "Add Resource" button on that menu bar.
You'll need to set Access Modifier: Public on this menu to use this Resource in code.
Add a key and a value to this Strings table, for example:
Name  | Value     | Comment

----------------------------

MyKey | Something | Nothing
Consuming this Resource in code
So, how can we use this newly created key-value in code? Super easy, barely an inconvenience!
Start off by hitting F6 to build your project.
Now open up your HomeController.cs just as an example.
Type the following code snippet:
MyWebApplication.Resources.MyResource.MyKey;As you type, you'll see IntelliSense along the way. To be precise, the MyKey property here is a public static string with a get method.
Voila! You can add as many keys as you like, and access them from anywhere in your project. Try adding different types of Resources and see what happens.
Resource Localization
I'll do another post about how Resources can be localized, to provide language-specific content to users with different browser locales, without having to write custom translation code.